import lombok.RequiredArgsConstructor;

@RequiredArgsConstructor
public class MyClass {
    private final String name;  // 생성자 매개변수로 포함됨
}

// 생성된 생성자:
// public MyClass(String name) {
//     this.name = name;
// }
final로 된 필드기반으로 생성자를 생성합니다.
@Getter
import lombok.Getter;

@Getter
public class MyClass {
    private String name;
    private int age;
}

// 생성된 메서드:
// public String getName() { return name; }
// public int getAge() { return age; }
필드기반으로 Getter를 생성합니다.
@Setter
import lombok.Setter;

@Setter
public class MyClass {
    private String name;
    private int age;
}

// 생성된 메서드:
// public void setName(String name) { this.name = name; }
// public void setAge(int age) { this.age = age; }
필드기반으로 Setter를 생성합니다.
@ToString
import lombok.ToString;

@ToString
public class MyClass {
    private String name;
    private int age;
}

// 생성된 메서드:
// public String toString() { return "MyClass(name=" + this.name + ", age=" + this.age + ")"; }
필드기반으로 toString()메서드를 자동으로 생성합니다. 로깅시 객체안에 있는 값을 편하게 볼 수 있습니다.
@Data
import lombok.Data;

@Data
public class MyClass {
    private String name;
    private int age;
}

// 생성되는 메서드:
// - Getter/Setter for name and age
// - toString(), equals(), hashCode()
장바구니의 전체 금액 >= 할인 기준금액일 경우 할인 프로모션을 적용시키는 시스템을 만드려고 합니다.
절차지향의 경우는 아래와 같습니다
// 할인
public class Promotion {
    private Long cartId;
    private Long basePrice;

    public Money getBasePrice() {
    	return basePrice;
    }
    public void setCart(Long cartId) {
   	 this.cartId = cartId;
    }
}

// 장바구니
public class Cart {
    private List<CartLineItem> items = new ArrayList<>();

    public Long getTotalPrice() {
    	return items.stream().mapToLong(CartLineItem::getPrice).sum();
    }
    public int getTotalQuantity() {
    	return items.stream().mapToInt(CartLineItem::getQuantity).sum();
    }
}

// 할인 프로세스
public class PromotionProcess {
    public void apply(Promotion promotion, Cart cart) {
        if (isApplicableTo(promotion, cart)) {
            promotion.setCart(cart);
        }
    }
    private boolean isApplicableTo(Promotion promotion, Cart cart) {
    	return cart.getTotalPrice() >= promotion.getBasePrice();
    }
}
절차지향의 경우 할인, 장바구니의 데이터영역과 할인 프로세스를 처리하는 프로세스영역으로 나누어져있습니다.
객체지향의 경우는 아래와 같습니다.
// 할인 + 할인프로세스
public class Promotion {
    private Cart cart;
    private Long basePrice;

    public void apply(Cart cart) {
    	if (cart.getTotalPrice() >= basePrice) {
    	this.cart = cart;
    	}
    }
}

// 장바구니
public class Cart {
    private List<CartLineItem> items = new ArrayList<>();

    public Long getTotalPrice() {
    	return items.stream().mapToLong(CartLineItem::getPrice).sum();
    }
    public int getTotalQuantity() {
    	return items.stream().mapToInt(CartLineItem::getQuantity).sum();
    }
}
절차지향과 다르게 객체지향은 데이터와 프로세스 영역으로 나누어져있지 않습니다. 할인과 관련된 것들끼리 다 모여있고 장바구니 관련된 것끼리 다 모여있습니다.
절차지향과 객체지향의 차이를 이야기할 때는 변경이라는게 중요합니다. 어떤 변경에 어떤 방식이 유연한지에 대한 것입니다. 위에 예제 기반으로 더 진행하자면 이번에는 최소금액 <= 장바구니금액 <= 최대금액일 경우에 할인이 적용되게끔 변경해달라는 요청이 있을 때 처리하는 방법입니다.
절차지향의 경우 아래와 같습니다.
// 할인 적용 프로세스
public class PromotionProcess {
    public void apply(Promotion promotion, Cart cart) {
        if (isApplicableTo(promotion, cart)) {
            promotion.setCart(cart);
        }
    }

    private boolean isApplicableTo(Promotion promotion, Cart cart) {
    	return cart.getTotalPrice() >= promotion.getMinPrice()
        &&     cart.getTotalPrice() <= promotion.getMaxPrice()
    }
}

// 할인
public class Promotion {
    private Long cartId;
    private Long minPrice;
    private Long maxPrice;

    public Long getMinPrice() {
        return minPrice;
    }
    public Long getMaxPrice() {
    	return maxPrice;
    }
    public void setCart(Long cartId) {
        this.cartId = cartId;
    }
}
절차지향의 경우 할인 적용시킬 기준 금액인 최소금액과 최대금액을 추가시켰습니다. Promotion과 PromotionProcess 두군데에서 수정이 이루어졌습니다.
객체지향의 경우 아래와 같습니다.
public class Promotion {
    private Cart cart;
    private Long minPrice;
    private Long maxPrice;

    public void apply(Cart cart) {
    	if (cart.getTotalPrice() >= basePrice &&
    		cart.getTotalPrice() >= maxPrice) {
        	this.cart = cart;
    	}
    }
}
객체지향의 경우 Promotion에 Promotion관련 필드와 로직이 다 들어있기 때문에 Promoiton 한군데에서만 수정이 이루어졌습니다.
변경사항이 또 들어왔습니다. 이번에는 할인 조건을 하나 더 추가하는데 장바구니의 상품수 >= 프로모션 상품수일 경우 할인을 해줍니다. 할인을 받기 위해서는 설정한 프로모션 상품수보다 장바구니에 더 많이 담으면 할인을 해준다는 것이죠
절차지향의 경우 아래와 같습니다.
// 할인 프로세스
public class PromotionProcess {
    public void apply(Promotion promotion, Cart cart) {
        if (isApplicableTo(promotion, cart)) {
    		promotion.setCart(cart);
    	}
    }

    private boolean isApplicableTo(Promotion promotion, Cart cart) {
        switch (promotion.getConditionType()) {
            case PRICE:
            	return cart.getTotalPrice() >= promotion.getBasePrice();
            case QUANTITY:
                return cart.getTotalQuantity() >= promotion.getBaseQuantity
        }
    	return false;
    }
}

// 할인
public class Promotion {
    public enum ConditionType {
    	PRICE, QUANTITY
    }

    private Long cartId;
    private Long basePrice;
    private int baseQuantity;

    public ConditionType getConditionType() {
    	return conditionType;
    }
    public Money getBasePrice() {
   	 return basePrice;
    }
    public int getBaseQuantity() {
    	return baseQuantity;
    }
    public void setCart(Long cartId) {
    	this.cartId = cartId;
    }
}
절차지향의 경우는 가격 또는 개수에 따른 할인 조건이 두개라서 CondtionType을 할인 모델에 추가시켰습니다. 그리고 할인을 위한 기준 금액과 기준 개수가 필요하기 때문에 basePrice와 baseQuantity를 만들어줬습니다.
이럴경우 되게 코드가 지저분해보이며 모델도 추가해줘야하고 프로세스도 수정해야하는 여러군데에서 수정이 필요합니다. 또 할인 유형이 생기는 경우 더 늘어나게 됩니다.
객체지향의 경우 아래와 같습니다.
// 할인
public class Promotion {
    private Cart cart;
    private DiscountCondition condition;

    public void apply(Cart cart) {
    	if (condition.isApplicableTo(cart)){
        	this.cart = cart;
        }
    }
}

// 장바구니
public class Cart {
	private List<CartLineItem> items = new ArrayList<>();

	public Long getTotalPrice() {
		return items.stream().mapToLong(CartLineItem::getPrice).sum();
	}
	public int getTotalQuantity() {
		return items.stream().mapToInt(CartLineItem::getQuantity).sum();
	}
}

// 할인 인터페이스
public interface DiscountCondition {
	boolean isApplicableTo(Cart cart);
}

// 가격 할인 구현체
public class PriceCondition implements DiscountCondition {
    private Long basePrice;

    @Override
    public boolean isApplicableTo(Cart cart) {
    	return cart.getTotalPrice() >= basePrice;
    }
}

// 개수 할인 구현체
public class QuantityCondition implements DiscountCondition {
    private int baseQuantity;

    @Override
    public boolean isApplicableTo(Cart cart) {
    	return cart.getTotalQuantity() >= baseQuantity;
    }
}
객체지향의 경우 다형성을 이용해야합니다. 그렇기 때문에 interface를 만들어줍니다. Promotion의 apply에서는 interface를 받게끔 해줍니다.
파일은 많아집니다만 이런식으로 객체지향식으로 설계가 되어있는 상태에서 다른 할인 유형에 대한 처리가 필요한 경우 DiscountCondition을 상속받아 구현하면 됩니다.
Promotion에서 apply는 수정할 필요도 없습니다. DiscountCondition을 상속받은 구현체만 껴주기만 하면 됩니다. 그리고 Promotion을 건들 필요가 없기 때문에 실질적으로 DiscountCondition을 상속받아서 만들어주기만 하면 됩니다. 파일 수정도 한군데에서만 일어나게 됩니다. 이곳저곳 수정할 필요도 없고 DiscountCondition을 무조건 받아야하기 때문에 절차적인 것처럼 임의대로 막 만들수도 없어 개발이 체계적으로 보입니다.
위와 같은 상황인 같은 기능을 다른로직으로 갈아껴야하는 상황에는 객체지향이 유리합니다만 무조건적으로 객체지향이 유리하지는 않습니다. 새로운 요구사항을 추가해봅시다. 장바구니에 대한 할인이였는데 이번에는 장바구니에 있는 하나의 상품에 대한 할인 적용을 만들어봅시다. 이번에는 상품인 Item에 대한 모델은 따로 안 만들고 할인에 대한 프로세스에만 집중해봅시다.
절차지향의 경우 아래와 같습니다.
// 할인 프로세스
public class PromotionProcess {
	public void apply(Promotion promotion, Cart cart) {
		if (isApplicableTo(promotion, cart)) {
			promotion.setCart(cart);
		}
	}

	private boolean isApplicableTo(Promotion promotion, Cart cart) {
		switch (promotion.getConditionType()) {
			case PRICE:
				return cart.getTotalPrice() >= promotion.getBasePrice();
			case QUANTITY:
				return cart.getTotalQuantity() >= promotion.getBaseQuantity();
		}
		return false;
	}

	// 새로 추가된 상품에 대한 할인 적용
	public boolean isApplicableTo(Promotion promotion, CartLineItem item) {
		switch (promotion.getConditionType()) {
			case PRICE:
				return item.getTotalPrice() >= promotion.getBasePrice();
			case QUANTITY:
				return item.getTotalQuantity() >= promotion.getBaseQuantity();
		}
		return false;
	}
}
절차지향의 경우 상품을 매개변수로 받아야 하기 때문에 또 다른 함수를 만듭니다. 다른 파일 건들 필요 없이 간단하게 PromotionProcess에만 추가하면 됩니다.
객체지향의 경우 아래와 같습니다.
// 할인
public class Promotion {
    private Cart cart;
    private DiscountCondition condition;

    public void apply(Cart cart) {
        if (condition.isApplicableTo(cart)) {
            this.cart = cart;
        }
    }
}

// 할인 인터페이스
public interface DiscountCondition {
    boolean isApplicableTo(Cart cart);
    boolean isApplicableTo(CartLineItem item);
}

// Price 할인 구현체
public class PriceCondition implements DiscountCondition {
    private Long basePrice;

    @Override
    public boolean isApplicableTo(Cart cart) {
	    return cart.getTotalPrice() >= basePrice;
    }

    @Override
    public boolean isApplicableTo(CartLineItem item) {
    	return item.getPrice() >= basePrice;
    }
}

// Quantity 할인 구현체
public class QuantityCondition implements DiscountCondition {
    private int baseQuantity;

    @Override
    public boolean isApplicableTo(Cart cart) {
    	return cart.getTotalQuantity() >= baseQuantity;
    }

    @Override
    public boolean isApplicableTo(CartLineItem item) {
    	return item.getQuantity() >= basePrice;
    }
}
객체지향의 경우 Interface의 함수를 추가해야하고 이걸 무조건 구현해야하기 때문에 이걸 상속받은 구현체들의 코드는 다 추가되어야합니다. 또한 여기선 Promotion에 코드를 추가 안 했지만 Promotion 코드도 추가해야하기 때문에 총 4개의 파일을 수정해야합니다.
위와 같이 로직이 아예 다른 것을 추가할 때 객체지향의 경우 더 불리합니다. (장바구니할인 → 상품할인) 또 다른 예로는 타입 계층 전체 수정이 있는 경우입니다. Cart와 Promotion 모델을 합쳐서 CartWithPromotion 모델을 만들어야하는 예를 들어봅시다.
절차지향의 경우 아래와 같습니다.
public class PromotionProcess {

    public CartWithPromotion convertToCartWithPromotion(
	Promotion promotion,
    Cart cart) {
        CartWithPromotion result = new CartWithPromotion();
        result.setTotalPrice(cart.getTotalPrice());
        result.setTotalQuantity(cart.getTotalQuantity());
        result.setPromotionBasePrice(promotion.getBasePrice());
        result.setPromotionBaseQuantity(promotion.getBaseQuantity());
        return result;
    }
}
절차지향의 경우는 되게 간단하게 처리가 가능합니다. 두개의 모델을 받아서 그냥 새로운 모델에 넣어서 반환하면 됩니다.
객체지향의 경우 아래와 같습니다.
public class Promotion {
    private Cart cart;
    private DiscountCondition condition;
    ...

    public CartWithPromotion convertToCartWithPromotion() {
        CartWithPromotion result = new CartWithPromotion();
        result.setTotalPrice(cart.getTotalPrice());
        result.setTotalQuantity(cart.getTotalQuantity());

        if (condition instanceof PriceCondition) {
            result.setPromotionBasePrice(
            ((PriceCondition)condition).getBasePrice());
        }
        if (condition instanceof QuantityCondition) {
            result.setPromotionBaseQuantity(
            ((QuantityCondition)condition).getBaseQuantity());
        }
    	return result;
    }
}
객체지향의 경우는 되게 복잡하게 처리해야합니다. Interface로 다형성을 유지해야하기 때문에 어떤 구현체가 들어올지 몰라 instanceof를 통해 클래스를 확인한 이후에 각각 다르게 처리해야합니다. 복잡하고 되게 어색합니다.
최종적으로 정리해 간단 요약하면 아래 표와 같습니다.
절차적인 설계
객체지향 설계
포맷 변경을 위한 데이터 변환 (데이터 합치기)
규칙에 기반한 상태 변경 (체계적) [복잡한 설계에 유리]
데이터 중심
행동 중심
데이터 노출
데이터 캡슐화
기능 추가에 유리 (아예 새로운 기능 → 장바구니가 아닌 상품 할인 기능이 필요한 경우)
타입 확장에 유리 (본질적인 기능은 같지만 다양하게 확장 가능 → 인터페이스로 인한 할인 확장)
데이터와 프로세스가 명확히 분리
데이터 프로세스 같이 존재 (클래스 안에 할인 관련된 데이터와 할인 프로세스가 같이 들어있다)
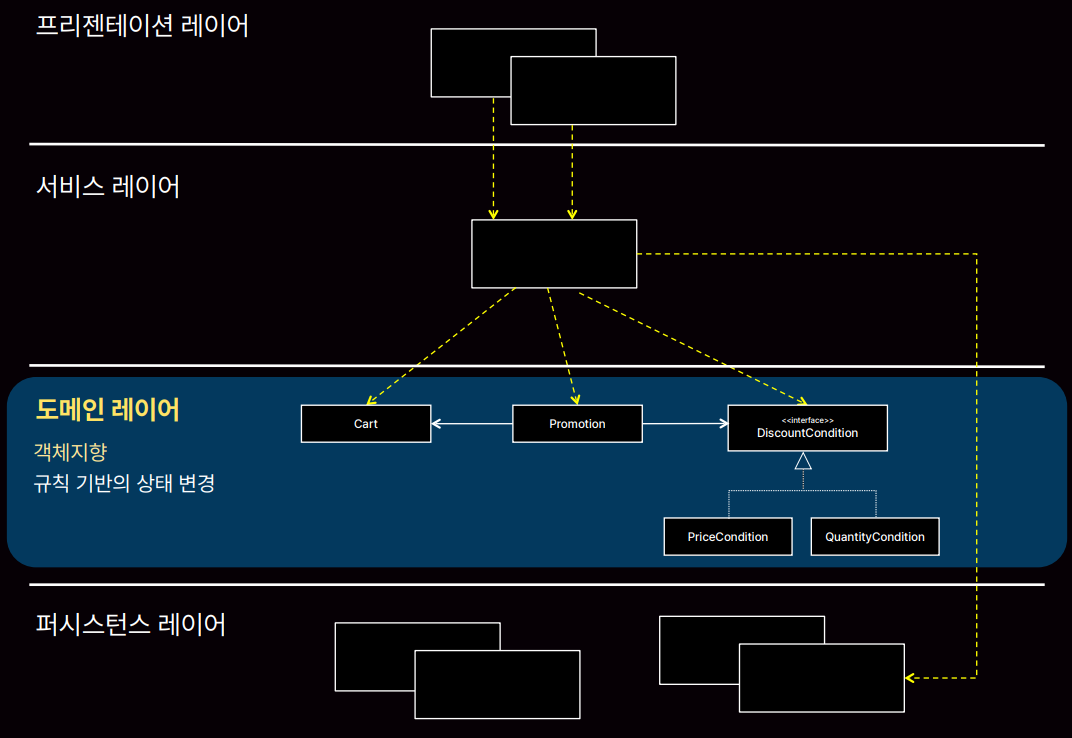
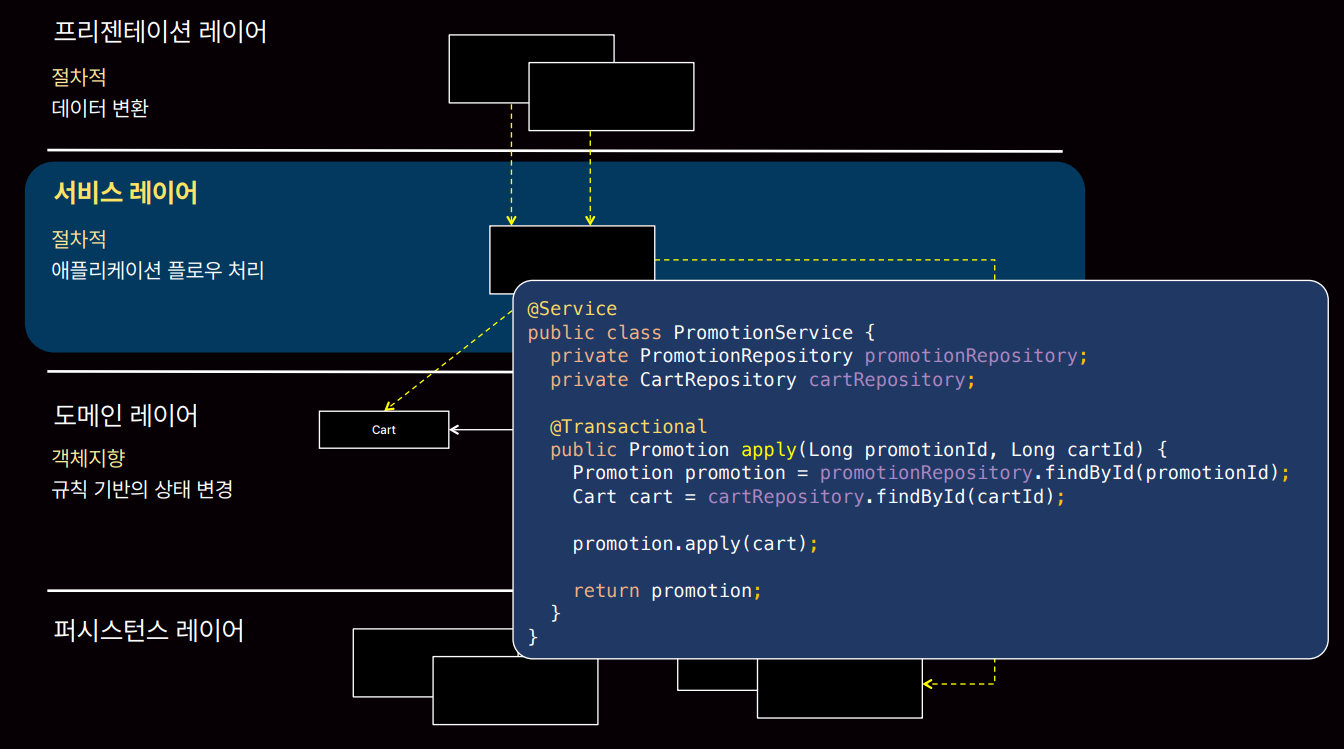
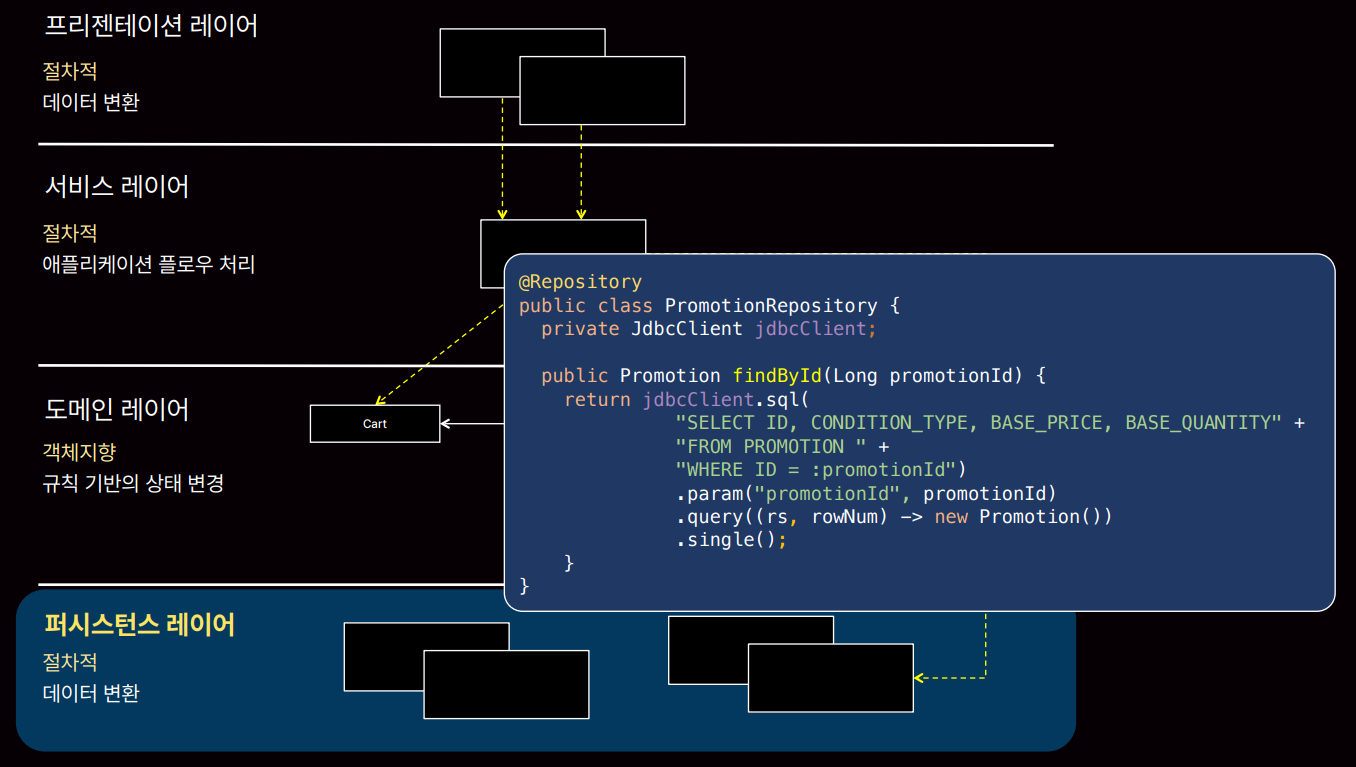
도메인 레이어의 경우 객체지향이 좋습니다. (어떤 할인 내용을 적용시킬지 = 할인이라는 공통 분모)
프레젠테이션 레이어의 경우 데이터를 반환하기 때문에 절차지향에 좋습니다.
서비스 레이어의 경우 비즈니스로직은 순차적 처리가 필요하기 때문에 절차지향에 좋습니다. (서비스에 어떤 할인을 적용시킬지 이런 내용인 인터페이스를 상속받은 구현체가 들어가서 절차지향에 객체지향이 들어간 형태입니다.)
퍼시스턴스 레이어의 경우 DB 쿼리문 조회하고 이런 부분은 순차 처리가 필요하기 때문에 절차지향에 좋습니다.
이미 우리는 상황에 맞게 절차지향과 객체지향을 섞어 쓰고 있습니다. 즉, 우월하다 이런 건 없고 상황에 맞게 잘 써야합니다.
📝 인터페이스 vs 추상클래스
인터페이스
public interface Animal {
    void eat();  // 메서드 선언 (구현 X)
    void sleep();
}

public class Dog implements Animal {
    @Override
    public void eat() {
        System.out.println("Dog eats.");
    }

    @Override
    public void sleep() {
        System.out.println("Dog sleeps.");
    }
}
인터페이스의 특징은 아래와 같습니다.
다중 상속 가능
행동의 규약 정의 → 해당 메소드는 반드시 구현해야 함
무엇을 해야하는 가를 정의한다.
추상클래스
public abstract class Animal {
    private String name;  // 멤버 변수

    public Animal(String name) {
        this.name = name;
    }

    public void breathe() {
        System.out.println(name + " is breathing."); // 일반 메서드
    }

    public abstract void eat();  // 추상 메서드
}

public class Dog extends Animal {
    public Dog(String name) {
        super(name);
    }

    @Override
    public void eat() {
        System.out.println("Dog eats.");
    }
}
추상클래스의 특징은 아래와 같습니다.
단일 상속
추상클래스에서 이미 구현되어있기 때문에 상속받아서 직접 구현 안 해도 된다.
기본적인 공통기능에 사용하며 만약 커스텀이 필요한 경우 @overrid로 재정의해서 사용하면 좋다.
공통메서드를 사용하거나 커스텀이 필요한 경우 @override 재정의가 가능하기 때문에 interface처럼 규약에 덜 얽매인다.
@Configuration과 @Bean을 이용해도 되지만 점점 많아지게되면 힘들고 파일 하나에 엄청난 @Bean이 생겨날 수 있다.
이걸 깔끔하게 만드는 법이 컴포넌트 스캔이다. 컴포넌트 스캔은 @Component가 붙은 정보를 Bean으로 등록하게 된다.
컴포넌트 스캔
@Configuration
@ComponentScan(
	excludeFilters = @Filter(type = FilterType.ANNOTATION, classes = Configuration.class))
public class AutoAppConfig {
}
컴포넌트
@Component
public class MemoryMemberRepository implements MemberRepository {}
이렇게 되면 @Component가 붙은 MemoryMemberRepository를 Bean으로 등록할 수 있다.
📝@Bean vs @Component
@Bean은 이제 더이상 쓸모 없는 행동일까? 어떤 상황에 @Bean을 쓰고 어떤 상황에 @Component를 쓰는지 알아보자
Bean 등록 방식 (@Bean, @Component)
// 이전 방식 사용
@Configuration
public class AppConfig {

    @Bean
    public MyService myService() {
        return new MyService(); // MyService를 빈으로 등록
    }

    @Bean
    public MyComponent myComponent() {
        // MyComponent가 MyService를 필요로 한다고 명시적으로 주입
        return new MyComponent(myService());
    }
}

//이후 방식 사용
@Component
public class MyService {
    // 빈으로 등록될 클래스
}

@Component
public class MyComponent {

    private final MyService myService;

    // @Autowired를 통해 Spring이 자동으로 MyService 빈을 주입함
    @Autowired
    public MyComponent(MyService myService) {
        this.myService = myService;
    }
}
비교하기 위해 동일한 빈 등록하는 방식을 Bean과 Component로 보여줬다.
@Bean
@Configuration이 필요하다
메소드 단위에 붙이게 된다. 해당 메소드는 클래스를 반환해야한다 (Component에서 해당 클래스가 @Component가 된다)
의존관계 주입을 직접 Inject을 하기 때문에 Autowired를 통해 Injection할 필요가 없다
MyComponent에 myService()를 매개변수로 직접 넣어주고 있다.
@Component
클래스 단위에 붙이게 된다. 해당 클래스는 빈으로 등록되게 된다.
의존관계 주입시 @Autowired를 사용한다
일반적으로 @Component를 많이 사용한다. @Bean 방식하고 비교하면 코드수도 확연히 줄어들게 된다. 하지만 @Bean도 필요할 때가 있다.
@Configuration
public class DataSourceConfig {

    @Bean
    public DataSource dataSource() {
        HikariDataSource dataSource = new HikariDataSource(); // 외부 라이브러리 클래스 인스턴스 생성
        dataSource.setJdbcUrl("jdbc:mysql://localhost:3306/mydb");
        dataSource.setUsername("username");
        dataSource.setPassword("password");
        return dataSource;
    }
}
HikariDataSource의 경우 외부 라이브러리이기 때문에 내가 직접 @Component를 붙일 수가 없다. 스프링에서 관리가 필요한데 이럴 경우 위 코드와 같이 직접 HikariDataSource의 객체를 만들고 return시킨 이후에 해당 것을 빈객체로 등록하게 되면 된다. 이럴 경우 HikariDataSource를 new해서 사용하면 안 되고 내가 Bean으로 등록한 DataSourceConfig의 dataSource()를 사용해야한다.
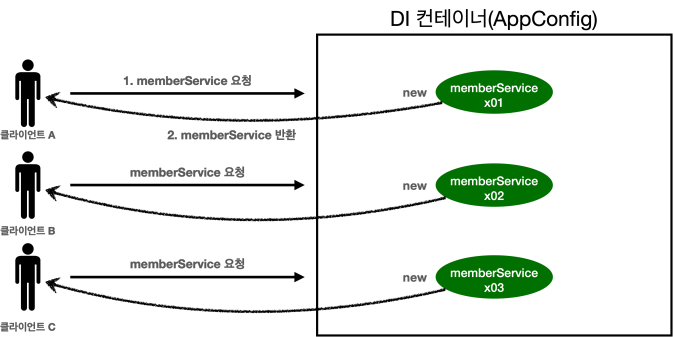
스프링 없는 순수한 DI 컨테이너인 AppConfig는 요청을 할 때 마다 객체를 새로 생성한다 그래서 초당 100의 요청이 오면 100개의 객체가 생성되고 소멸되어 메모리 낭비가 심해진다. 해결방안으로는 딱 1개만 생성되고 공유하도록 설계하면 된다.
📝싱글톤 패턴
1개만 생성되고 그것을 공유하도록 하는 패턴이다. 즉, 클래스의 인스턴스가 딱 1개만 생성되는 걸 보장해준다. 그래서 2개 이상 생성이 안 된다. 주의점으로 private으로 만들어서 임의로 new 키워드로 만들 수 없게 해야한다.
싱글톤 패턴 적용
public class SingletonService {

  //1. static 영역에 객체를 딱 1개만 생성해둔다.
  private static final SingletonService instance = new SingletonService();

  //2. public으로 열어서 객체 인스턴스가 필요하면 이 static 메서드를 통해서만 조회하도록 허용한다.
  public static SingletonService getInstance() {
    return instance;
  }

  //3. 생성자를 private으로 선언해서 외부에서 new 키워드를 사용한 객체 생성을 못하게 막는다.
  private SingletonService() {

  }

  public void logic() {
    System.out.println("싱글톤 객체 로직 호출");
  }
}
테스트 코드
@Test
@DisplayName("싱글톤 패턴을 적용한 객체 사용")
public void singletonServiceTest() {
    //private으로 생성자를 막아두었다. 컴파일 오류가 발생한다.
    // new SingletonService();

    //1. 조회: 호출할 때 마다 같은 객체를 반환
    SingletonService singletonService1 = SingletonService.getInstance();

    //2. 조회: 호출할 때 마다 같은 객체를 반환
    SingletonService singletonService2 = SingletonService.getInstance();

    //참조값이 같은 것을 확인
    System.out.println("singletonService1 = " + singletonService1);
    System.out.println("singletonService2 = " + singletonService2);

    // singletonService1 == singletonService2
    assertThat(singletonService1).isSameAs(singletonService2);
    singletonService1.logic();
}
하지만 이상적이지만은 않다. 싱글톤 패턴을 사용할 때 문제점이 있는데 아래와 같다.
싱글톤 패턴 문제점
싱글톤 패턴은 구현 코드 자체가 많이들어간다.
클라이언트가 구체 클래스를 의존해 DIP를 위반한다.
구체 클래스 의존으로 인해 OCP 위반 가능성이 높다.
테스트가 어렵다.
내부 속성 변경이나 초기화가 어렵다.
내부 속성 변경하게끔하면 공유해서 쓰기 때문에 여러곳에서 쓰일 경우 각종 문제들이 터질 가능성이 매우 높다. 즉, 무상태로 설계해야한다.
private 생성으로 자식 클래스 만들기가 어렵다.
위와 같은 이유로 유연성이 떨어져 안티패턴으로 불린다.
📝싱글톤 컨테이너
우리가 직접 싱글톤을 구현해서 사용할 때는 이러한 문제점들이 있다. 그러면 스프링의 경우는 어떨까? 스프링은 싱글톤의 문제점들을 다 해결하면서 싱글톤의 장점만 취한다.
@Configuration
public class AppConfig {

  @Bean
  public MemberService memberService() {
    // memberRepository 호출
    return new MemberServiceImpl(memberRepository());
  }

  @Bean
  public OrderService orderService() {
    // memberRepository 호출
    return new OrderServiceImpl(
        memberRepository(),
        discountPolicy());
  }

  @Bean
  public MemberRepository memberRepository() {
    return new MemoryMemberRepository();
  }
}
memberService빈을 만드는 코드를 보면 memberRepository()를 호출한다
orderService빈을 만드는 코드를 보면 memberRepository()를 호출한다
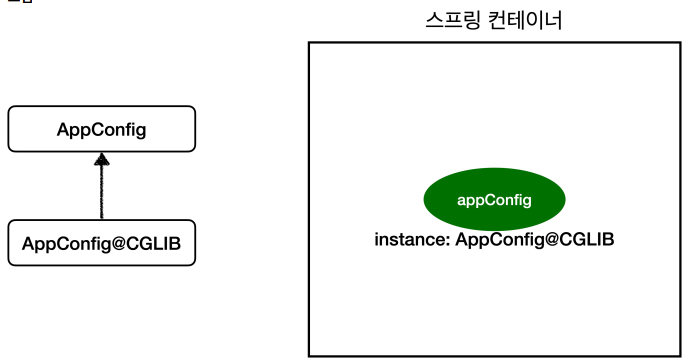
결과적으로 2개의 MemoryMemberRepository가 생성되면서 싱글톤이 깨진 것처럼 보인다. 이러한 스프링 컨테이너의 문제점을 어떻게 해결할까?
기본적으로 특정 Reader가 존재해 Bean 설정 정보를 읽고 메타 정보를 만들어 사용하게 된다. BeanDefinition에는 Bean의 메타정보들이 들어있다. 직접 Reader와 Definition을 Bean의 작성방식을 내 임의대로 커스텀해서 만들 수도 있지만 거의 사용되진 않는다.
@Configuration
public class AppConfig {
  @Bean
  public MemberService memberService() {
    return new MemberServiceImpl(memberRepository());
  }

  @Bean
  public MemberRepository memberRepository() {
    return new MemoryMemberRepository();
  }

}
@Configuration
해당 설정을 Spring Container로 사용하겠다는 의미이다.
@Bean
Spring Container에 등록하겠다는 의미로 해당 정보를 다른 곳에서 꺼내서 쓸 수 있게 도와준다. 기본적으로 메서드의 명을 스프링 빈의 이름으로 사용한다. (물론 변경 가능)
주의점으로 Bean이름이 겹치면 안 된다. (유일해야 함)
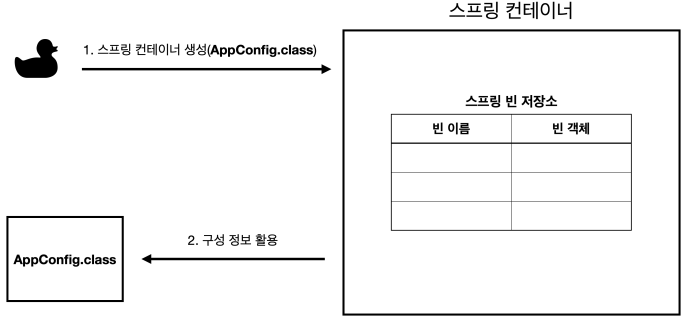
public class MemberApp {
  public static void main(String[] args) {

    /** AppConfig설정이 들어간 Spring Container를 사용하겠다 **/
    ApplicationContext applicationContext = new
        AnnotationConfigApplicationContext(AppConfig.class);

    /** Spring Container에 등록된 Bean에서 MemberService를 가져오겠다. **/
    MemberService memberService =
        applicationContext.getBean("memberService", MemberService.class);


    /** 회원가입 **/
    Member member = new Member(1L, "memberA", Grade.VIP);
    memberService.join(member);

    /** 회원찾기 **/
    Member findMember = memberService.findMember(1L);

    System.out.println("new member = " + member.getName());
    System.out.println("find Member = " + findMember.getName());
  }
}
📝Spring Bean 조회해보기
부모타입으로 조회하면 자식 타입도 함께 조회한다. 그래서 Object 타입으로 조회하면 모든 스프링 빈을 조회하게 된다.
public class MemberServiceImpl implements MemberService {
  private final MemberRepository memberRepository = new
      MemoryMemberRepository();

  public void join(Member member) {
    memberRepository.save(member);
  }

  public Member findMember(Long memberId) {
    return memberRepository.findById(memberId);
  }
}
MemberService
public interface MemberService {
  void join(Member member);
  Member findMember(Long memberId);
}
위 코드는 회원가입하고 회원을 찾는 로직들이 들어간 코드들이다. MemberServiceImple에서 new MemoryMemberRepository()를 통해 Repository를 어떤 걸 쓸지 직접 정해주고 있어서 OCP/DIP를 위반하고 있다.
📝스프링의 핵심 기능 사용하기 후
AppConfig
public class AppConfig {
  public MemberService memberService() {
    return new MemberServiceImpl(new MemoryMemberRepository());
  }
}
MembmerServiceImpl
public class MemberServiceImpl implements MemberService {
  private final MemberRepository memberRepository;

  public MemberServiceImpl(MemberRepository memberRepository) {
    this.memberRepository = memberRepository;
  }

  public void join(Member member) {
    memberRepository.save(member);
  }

  public Member findMember(Long memberId) {
    return memberRepository.findById(memberId);
  }
}
MembmerService
public interface MemberService {
  void join(Member member);
  Member findMember(Long memberId);
}
AppConfig에서 New해서 관리하기 때문에 더이상 MemberServiceImpl에서 MemberRepository를 New로 넣을 필요 없고 코드 수정도 필요가없다. 이렇게 함으로 OCP/DIP를 MemberServiceImpl은 지킬 수 있고 그 책임을 AppConfig에서 하게 된다.
📝IoC / DI 컨테이너
프로그램의 제어 흐름을 직접 제어하는 것이 아니라 외부에서 관리하는 것을 제어의 역전(IoC)라고 한다. 위에 코드로 이야기하자면 AppConfig에서 모두 관리하기 때문에 이걸IoC 컨테이너 또는 DI(의존 주입) 컨테이너라고 한다.
위 예시로 설명하면 MemberService에 대한 Repository 제어를 MemberService에서 하는 게 아니라 AppConfig에서 하기 때문에 제어가 역전되었다라고 이야기하고 DI 즉, 의존을 주입하는 역할을 해서 DI 컨테이너라고 불리는 것이다.