반응형
반응형

📝Exclude<UnionType, ExcludedMembers>

type T0 = Exclude<"a" | "b" | "c", "a">;
// type T0 = "b" | "c"
type T1 = Exclude<"a" | "b" | "c", "a" | "b">;
// type T1 = "c"
type T2 = Exclude<string | number | (() => void), Function>;
// type T2 = string | number

UnionType에 할당된 것에 제외할 멤버를 제외하고 Type 형식을 구성합니다


📝Extract<Type, Union>

type T0 = Extract<"a" | "b" | "c", "a" | "f">;
// type T0 = "a"
type T1 = Extract<string | number | (() => void), Function>;
// type T1 = () => void

Type과 Union의 교집합에 해당하는 부분으로 Type형식을 구성합니다


📝NonNullable<Type>

type T0 = NonNullable<string | number | undefined>;
// type T0 = string | number
type T1 = NonNullable<string[] | null | undefined>;
// type T1 = string[]

null및 undefined를 제외하여 유형을 구성합니다


📝Parameters<Type>

function greet(name: string, age: number): string {
  return `Hello, ${name}. You are ${age} years old.`;
}
type GreetParameters = Parameters<typeof greet>;
// GreetParameters 타입은 [string, number]와 동일합니다.
const user: GreetParameters = ["John Doe", 30];

유틸리티 타입은 함수의 매개변수 타입들을 튜플 타입으로 추출합니다


📝ConstructorParameters

class User {
  constructor(public name: string, public age: number) {}
}

// User 생성자의 매개변수 타입을 추출합니다.
type UserConstructorParameters = ConstructorParameters<typeof User>;

// UserConstructorParameters는 [string, number] 타입과 동일합니다.
const userParams: UserConstructorParameters = ["Jane Doe", 32];

클래스 생성자의 매개변수 타입들을 튜플로 추출합니다


📝ReturnType<Type>

function getUser() {
  return { name: "John Doe", age: 30 };
}

// getUser 함수의 반환 타입을 추출합니다.
type User = ReturnType<typeof getUser>;

// User 타입은 { name: string; age: number; }와 동일합니다.
const user: User = { name: "Jane Doe", age: 32 };

함수의 반환 타입을 추출하는 유틸리티 타입입니다

반응형
반응형

📝Awaited<Type>

type A = Awaited<Promise<string>>;
// type A = string
type B = Awaited<Promise<Promise<number>>>;
// type B = number
type C = Awaited<boolean | Promise<number>>;
// type C = number | boolean

프로미스(Promise)가 resolve된 후의 타입을 나타내는 유틸리티 타입입니다

📝Partial<Type>

interface Todo {
  title: string;
  description: string;
}
 
function updateTodo(todo: Todo, fieldsToUpdate: Partial<Todo>) {
  return { ...todo, ...fieldsToUpdate };
}
 
const todo1 = {
  title: "organize desk",
  description: "clear clutter",
};
 
const todo2 = updateTodo(todo1, {
  description: "throw out trash",
});

기존 타입의 구조를 유지하면서 모든 필드를 필수가 아닌 선택적으로 변경할 수 있습니다


📝Required<Type>

interface Props {
  a?: number;
  b?: string;
}
 
const obj: Props = { a: 5 };
const obj2: Required<Props> = { a: 5 };
// Property 'b' is missing in type '{ a: number; }' but required in type 'Required<Props>'.

해당 필드에 내용이 반드시 필요하다는 선언이 가능합니다


📝Readonly<Type>

interface Todo {
  title: string;
}
 
const todo: Readonly<Todo> = {
  title: "Delete inactive users",
};
 
todo.title = "Hello";
Cannot assign to 'title' because it is a read-only property.

생성된 유형의 속성을 재할당할 수 없습니다


📝Record<Keys, Type>

Record <K, V>

export enum categoryEnum {
  FC12000000 = 'FC12000000',
  FC14000000 = 'FC14000000',
}

static readonly names: Record<categoryEnum, string> = {
    FC12000000: '취미 / 문구 / 도서',
    FC14000000: 'e쿠폰 / 여행 / 렌탈',
}

Typescript에서는 Record라는게 존재하는데 이것은 Map과 같이 Key, Value로 사용 가능한 타입이다


📝Pick<Type, Keys>

interface Todo {
  title: string;
  description: string;
  completed: boolean;
}
 
type TodoPreview = Pick<Todo, "title" | "completed">;
 
const todo: TodoPreview = {
  title: "Clean room",
  completed: false,
};

속성 집합(문자열 리터럴 또는 문자열 리터럴의 합집합) 을 선택하여 유형을 구성합니다


📝Omit<Type, Keys>

interface Todo {
  title: string;
  description: string;
  completed: boolean;
  createdAt: number;
}
 
type TodoPreview = Omit<Todo, "description">;
 
const todo: TodoPreview = {
  title: "Clean room",
  completed: false,
  createdAt: 1615544252770,
};

(문자열 리터럴 또는 문자열 리터럴의 합집합) 에서 모든 속성을 선택한 Type다음 제거 하여 유형을 구성합니다

반응형
반응형

📝인덱스 (index)

interface Person {
  name: string;
  age: number;
}

type NameType = Person["name"]; // string
type AgeType = Person["age"]; // number

const age: AgeType = 50
const nm: NameType = "Emily"

index라는 걸 이용해 해당 interface의 필요 타입을 발췌할 수 있다


📝조건부 유형

/** 기본 형태 **/
type IsStringType<T> = T extends string ? string[] : number[];

type T1 = IsStringType<string>; // type T1 = string[]
type T2 = IsStringType<number>; // type T2 = number[]

const a: T1 = ['홍길동', '임꺾정', '박혁거세'];
const b: T2 = [1000, 2000, 3000];

/** 유니온 타입인 경우 **/
type ToArray<Type> = Type extends any ? Type[] : never;
type StrArrOrNumArr = ToArray<string | number>;
// type StrArrOrNumArr = string[] | number[]

기본형태의 경우 제너릭 T가 string을 상속받을 수 있다면 string[]이 선언되고 그렇지 않으면 number[]가 선언된다

유니온의 타입의 경우 유니온 타입으로 생성된다


📝템플릿 리터럴형

type World = "world";

type Greeting = `hello ${World}`;
// type Greeting = "hello world"

type EmailLocaleIDs = "welcome_email" | "email_heading";
type FooterLocaleIDs = "footer_title" | "footer_sendoff";
 
type AllLocaleIDs = `${EmailLocaleIDs | FooterLocaleIDs}_id`;
// type AllLocaleIDs = "welcome_email_id" | "email_heading_id" | "footer_title_id" | "footer_sendoff_id"


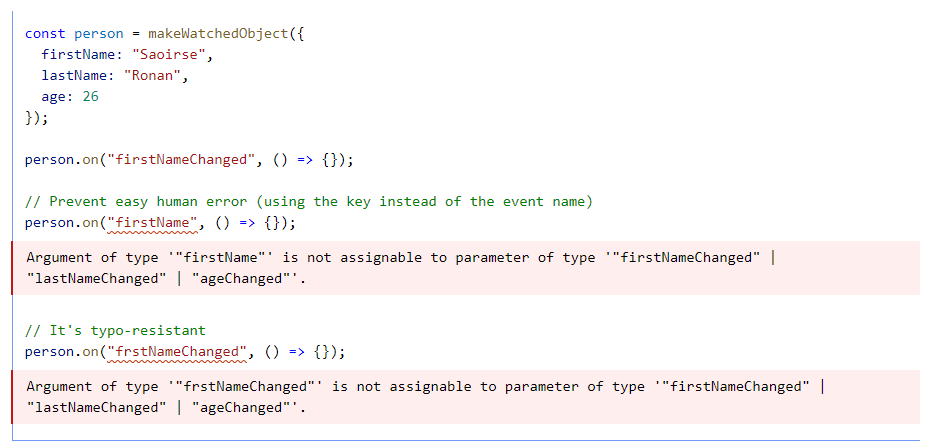
자바스크립트 이벤트 바인딩 on 재선언해서 타입스크립트 적용시키는 활용 예제

type PropEventSource<Type> = {
    on(eventName: `${string & keyof Type}Changed`, callback: (newValue: any) => void): void;
};
 
/// Create a "watched object" with an `on` method
/// so that you can watch for changes to properties.
declare function makeWatchedObject<Type>(obj: Type): Type & PropEventSource<Type>;


📝리터럴 타입 조작 유형

type Greeting = "Hello, world"
type ShoutyGreeting = Uppercase<Greeting>
// type ShoutyGreeting = "HELLO, WORLD"

type ASCIICacheKey<Str extends string> = `ID-${Uppercase<Str>}`
type MainID = ASCIICacheKey<"my_app">
// type MainID = "ID-MY_APP"

리터럴 타입을 조작할 수 있고 다양한 옵션들이 존재한다


📝Flatten

const a = {
  a : "key 'a'",
  b : {
    aa : "key 'b.aa'",
    bb : "key 'b.bb'",
  },
  c : {
    aa : {
      aaa : "key 'c.aa.aaa'",
      bbb : "key 'c.aa.bbb'",
    }
  },
}


const a = {
  "a" : "key 'a'",
  "b.aa" : "key 'b.aa'",
  "b.bb" : "key 'b.bb'",
  "c.aa.aaa" : "key 'c.aa.aaa'"
  "c.aa.bbb" : "key 'c.aa.bbb'"
}

Flatten이란 깊이가 1 이상인 object들을 일정한 키 생성 규칙에 따라 깊이가 1로 고정된 오브젝트로 전환하는 기능을 말한다


🔗 참고 및 출처


https://velog.io/@egoavara/flatten-%EC%98%A4%EB%B8%8C%EC%A0%9D%ED%8A%B8-%ED%83%80%EC%9E%85-%EC%B6%94%EB%A1%A0

https://inpa.tistory.com/entry/TS-%F0%9F%93%98-%ED%83%80%EC%9E%85%EC%8A%A4%ED%81%AC%EB%A6%BD%ED%8A%B8-%EC%A1%B0%EA%B1%B4%EB%B6%80-%ED%83%80%EC%9E%85-%EC%99%84%EB%B2%BD-%EC%9D%B4%ED%95%B4%ED%95%98%EA%B8%B0

반응형
반응형

📝as const

// 'status'의 타입은 리터럴 타입 "loading"으로 고정
const status = "loading" as const;

// [1,2,3]만 허용
const numbers = [1, 2, 3] as const;

리터럴 타입의 값을 그대로 타입으로 사용하게 만드는 역할이며 해당 값이 변하지 않을 "상수"임을 나타내며 TypeScript 컴파일러에게 값의 재할당이나 변경을 방지합니다


📝!postfix

function liveDangerously(x?: number | null) {
  // No error
  console.log(x!.toFixed());
}

!의 경우 해당 값은 Null이나 Undefined가 아니라는 강제성을 부여하는 명시입니다

데이터를 fetch한 이후에 undefined일수도 있다고 에러를 잡아줄 때 있는데 반드시 있는 경우라면 !을 이용해 처리가 가능합니다


📝optional

function printName(obj: { first: string; last?: string }) {
  // ...
}

printName({ first: "Bob" });
printName({ first: "Alice", last: "Alisson" });

? 을 이용해 "값이 없을 수 있다"라고 선언 가능

반응형
반응형


📝Json Interface 구현 및 라이브러리 타입 재정의

interface ITodo {
    id: number;
    text: string;
}

interface IToDoState {
    [key: string]: ITodo[];
}

const toDoState:IToDoState = {
    "To Do": [{id:1 , text:"To Do!!!"}],
    Doing: [{id:2 , text:"Doing!!!"}],
    Done: [{id:3 , text:"Done!!!"}],
};

/** ----------------------------------- **/

function getProperty<T, K extends keyof T>(obj: T, key: K) {
   return obj[key];
}

let x = { a: 1, b: 2, c: 3, d: 4 };
출처: https://inpa.tistory.com/entry/TS-📘-타입스크립트-Generic-타입-정복하기 [Inpa Dev 👨‍💻:티스토리]

toDoState를 보면 Json형식을 가지고 있고 “키”는 무조건 String이며 “값”은 ITodo[]입니다.

[key: string] 여러개의 key를 가진다

ITodo[] → ITodo의 Interface가 여러개를 가진다


declare module "iron-session" {
    interface IronSessionData {
        user?: {
            id: number;
        };
    }
}

만약에 라이브러리에 타입스크립트가 적용 안 된 라이브러리라면 어떻게 해야할까요? 타입스크립트로 프로젝트를 만든 경우 타입이 지정되지 않아 정상 동작하지 않게 되는 문제가 생기게 됩니다 이러한 경우 서드파트 및 라이브러리에 대한 타입선언을 우리가 직접적으로 해줘야합니다 이러한 선언들은 보통 .d.ts파일에다가 관리를 합니다


📝Flatten 

const a = {
  a : "key 'a'",
  b : {
    aa : "key 'b.aa'",
    bb : "key 'b.bb'",
  },
  c : {
    aa : {
      aaa : "key 'c.aa.aaa'",
      bbb : "key 'c.aa.bbb'",
    }
  },
}

const a = {
  "a" : "key 'a'",
  "b.aa" : "key 'b.aa'",
  "b.bb" : "key 'b.bb'",
  "c.aa.aaa" : "key 'c.aa.aaa'"
  "c.aa.bbb" : "key 'c.aa.bbb'"
}

깊이가 1 이상인 object들을 일정한 키 생성 규칙에 따라 깊이가 1로 고정된 오브젝트로 전환하는 기능


🔗 참고 및 출처

https://velog.io/@egoavara/flatten-%EC%98%A4%EB%B8%8C%EC%A0%9D%ED%8A%B8-%ED%83%80%EC%9E%85-%EC%B6%94%EB%A1%A0

반응형
반응형

📝Generic

/** ---- Generic ---- **/
// function getSize(arr: number[] | string[])

// ---- same as above ----
function getSize<T>(arr: T[]): number{
    return arr.length;
}

const arr1 = [1,2,3];
console.log(getSize<number>(arr1)); // 3

const arr2 = ["a", "b", "c"];
console.log(getSize<string>(arr2)); // 3

const arr3 = [false, true, true]
console.log(getSize<boolean>(arr3)); // 3

const arr4 = [{}, {}, {"name" : "team"}]
console.log(getSize<object>(arr4)); // 3

interface User2 {
    nm: string;
    age: number;
}

interface Book {
    price: number
}

/** ---- Generic extends ---- **/
const user2: User2 = {nm : "lee", age : 20};
const book: Book = {price : 3000};

// Generic을 확장해 nm : string을 반드시 포함시키는 타입만 받는다는 의미
function showMyName<T extends {nm : string}>(data: T): string {
    return data.nm;
}

showMyName(user2); // lee
showMyName(book);  // 에러 발생 (semantic)

/** Generic 추가 예시 **/
// 사용 예시
class Container<T> {
    private data: T[];

    addItem(item: T): void {
        this.data.push(item);
    }

    getItem(index: number): T {
        return this.data[index];
    }
}

/** -------------------------------------- **/

// 사용 예시
let numberContainer = new Container<number>();
numberContainer.addItem(1);
numberContainer.addItem(2);
let firstItem = numberContainer.getItem(0); // firstItem의 타입은 number

interface Pair<T, U> {
    first: T;
    second: U;
}

let pair1: Pair<number, string> = { first: 1, second: "two" };
let pair2: Pair<string, boolean> = { first: "three", second: true };

/** -------------------------------------- **/

// 제네릭 인터페이스
interface Mobile<T> { 
   name: string;
   price: number;
   option: T; // 제네릭 타입 - option 속성에는 다양한 데이터 자료가 들어온다고 가정
}

// 제네릭 자체에 리터럴 객테 타입도 할당 할 수 있다.
const m1: Mobile<{ color: string; coupon: boolean }> = {
   name: 's21',
   price: 1000,
   option: { color: 'read', coupon: false }, // 제네릭 타입의 의해서 option 속성이 유연하게 타입이 할당됨
};

const m2: Mobile<string> = {
   name: 's20',
   price: 900,
   option: 'good', // 제네릭 타입의 의해서 option 속성이 유연하게 타입이 할당됨
};

/** -------------------------------------- **/

function identity<T extends numOrStr>(p1: T): T {
   return p1;
}

/** -------------------------------------- **/
function translate<T extends (a: string) => number, K extends string>(x: T, y: K): number {
   return x(y);
}

// 문자숫자를 넣으면 정수로 변환해주는 함수
const num = translate((a) => { return +a; }, '10');
console.log('num: ', num); // num : 10

/** -------------------------------------- **/

// 사용 예시
const toArray2 = <T>(a: T, b: T): T[] => { ... }
// 출처: https://inpa.tistory.com/entry/TS-📘-타입스크립트-Generic-타입-정복하기 [Inpa Dev 👨‍💻:티스토리]


📝Keyof, as

/** ------ keyof ------ **/

interface Rabbit {
    name: string;
    age: number;
    place: string;
    move: () => void;
}

type KeyofRabbit = keyof Rabbit
// "name" | "age" | "place" | "move"

const rabbit1: KeyofRabbit = "age";  // 🆗 OK!
const rabbit2: KeyofRabbit = "food"; // ⚠️ Error!

/** ------ as ------ **/

const someValue: any = "This Is As Test";
const strLength: number = (someValue as string).length;

console.log(strLength);


/** ------ as keyof ------ **/
week[checkbox.code] → checkbox.code가 어떤 타입인지 몰라서 에러 발생
week[checkbox.code as keyof Week] → as keyof로 명시가능

keyof인터페이스에 정의된 “키”를 literal type으로 변경한다

as의 경우 any따위로 두루뭉실하게 잡힌 타입을 “어떠한 타입이다”라고 임시로 정해준다


📝typeof

const person = { name: "Alice", age: 25 };
type Person = typeof person; // { name: string; age: number; } 타입

typeof변수를 넣을 경우 변수의 타입을 유추해서 type을 만든다

반응형
반응형

📝교차 타입

interface Car{
    name: string;
    start(): void;
}

interface Toy{
    name: string;
    color: string;
    price: number
}

const toyCar: Toy & Car = {
    name: "타요",
    start() {},
    color: "blue",
    price: 10000
}


📝접근 제한자 - static, public, private, protected (type-script에서만 지원)

class Car {

    static wheels: number = 4; // 전역변수 처리 가능

    //private color: string = "car";
    color: string // default : public
    constructor(color: string) {
        this.color = color;
    }

    start() {
        console.log("start");
    }
}

class BMW extends Car {
    constructor(color: string) {
        super(color);
    }

    showColor() {
        console.log(`super.color : ${super.color}`);
        console.log(`this.color :  ${this.color}`);
    }
}

const bmw = new BMW('red');
bmw.showColor();
// super.color : undefined
// this.color :  red
console.log(`Car.wheels : ${Car.wheels}`); // Car.wheels : 4
반응형
반응형


📝function

function liveDangerously(x?: number | null) {
  // No error
  console.log(x!.toFixed());
}

/** ---- function ---- **/
function hello(name?: string, age?: number, hobby?: string | undefined){
    return `Hello, ${name}. You are ${age}. and My Hobby is ${hobby}`;
}

console.log(hello("Lee", 30)); // Hello, Lee. You are 30. and My Hobby is undefined

// 예시2
// void 리턴인 경우 리턴 값이 있을 수도 없을 수도 있다
type voidFunc = () => void;

const f1: voidFunc = () => {
  return true;
};


/** ---- Function ---- **/
// Function은 함수계의 any이다
function doSomething(f: Function) {
  return f(1, 2, 3);
}


📝나머지 인자값

/** ---- rest parameters ---- **/
function add(...nums: Array<number>) {
    return nums;
}

console.log(add(1,2,3,4,5,6)); // [ 1, 2, 3, 4, 5, 6 ]


📝this

/** ---- this ---- **/
interface User {
    name: string
}

const Sam: User = {name:'Sam'}

function showName (this:User, age: number, gender: 'm'|'f') {
    console.log(this.name, age, gender)
}

const userInfo = showName.bind(Sam); // bind()는 this 값을 셋팅해주는 작업이다.
userInfo(10,'m'); // Sam 10 m


반응형
반응형


📝리터럴

/** ---- 리터럴 ---- **/
function printText(s: string, alignment: "left" | "right" | "center") {
  // ...
}
printText("Hello, world", "left");

// 예시2
interface Options {
  width: number;
}
function configure(x: Options | "auto") {
  // ...
}
configure({ width: 100 });
configure("auto");

리터럴로 선언한 값만 사용 가능


📝유니온 타입

/** ---- 유니온 타입 ---- **/
function printId(id: number | string) {
  console.log("Your ID is: " + id);
}

printId(101); // OK
printId("202"); // OK

두개의 타입을 허용합니다


📝익명 함수

/** ---- 익명 함수 ---- **/
interface Minus {
    (num1 : number, num2 : number):number;
}

const minus: Minus = (x, y) => {
    return x - y;
}

console.log(minus(1,5)); // -4


📝Interface

/** ---- interface ---- **/
// 인터페이스는 ES6가 지원하지 않는 타입스크립트만의 특징으로 JS컴파일 후에 사라집니다.
interface Car {
    color: string;
    wheels: number;
    start() : void;
}

/** ---- interface extend interface ---- **/
// interface끼리 확장은 가능하지만 Java처럼 Interface 그 자체로는 사용을 못한다
interface Stuff {
    color: string
}

interface Mouse extends Stuff {
    name: string
}


📝Class

/** ---- class extends class ---- **/
class Cup {
    color: string;
    constructor(color: string) {
        this.color = color;
    }

    sayMyName(): void{
        console.log(this.color);
    }
}

class GlassCup extends Cup{

    name: string;

    constructor(color: string, name: string) {
        super(color);
        this.name = name;
    }
    sayMyName() {
        console.log("glassCup");
    }
}

let glassCup = new GlassCup("blue","france cup")

console.log(`glassCup.name : ${glassCup.name}`) // glassCup.name : france cup
glassCup.sayMyName(); // glassCup
  • 클래스의 경우 constructor가 필요하다 그렇지 않으면 에러 발생한다
  • this의 경우 클래스 안의 변수를 찾아간다 this를 사용하지 않으면 class 밖에 있는 변수를 찾아간다


Getter, Setter

class C {
  _length = 0;
  get length() {
    return this._length;
  }
  set length(value) {
    this._length = value;
  }
}

getter와 setter를 선언할 수 있다


오버라이드

class Base {
  greet() {
    console.log("Hello, world!");
  }
}
 
class Derived extends Base {
  greet(name?: string) {
    if (name === undefined) {
      super.greet();
    } else {
      console.log(`Hello, ${name.toUpperCase()}`);
    }
  }
}
 
const d = new Derived();
d.greet(); // Hello, world!
d.greet("reader"); // Hello, READER

오버라이드할 때 상위 클래스의 형태를 포함하고 있지 않으면 에러가 발생한다 위의 코드의 경우는 optional처리가 되어있어서 상관 없지만 그렇지 않으면 에러 발생합니다


public, protected, private, static

/** public **/
class Greeter {
  public greet() {
    console.log("hi!");
  }
}
const g = new Greeter();
g.greet();

/** protected **/
class Greeter {
  public greet() {
    console.log("Hello, " + this.getName());
  }
  protected getName() {
    return "hi";
  }
}
 
class SpecialGreeter extends Greeter {
  public howdy() {
    // OK to access protected member here
    console.log("Howdy, " + this.getName());
  }
}
const g = new SpecialGreeter();
g.greet(); // OK
g.getName();
// Property 'getName' is protected and only accessible within class 'Greeter' and its subclasses

/** private **/
class Base {
  private x = 0;
}
const b = new Base();
// Can't access from outside the class
console.log(b.x);
// Property 'x' is private and only accessible within class 'Base'.

/** static **/
class MyClass {
  static x = 0;
  static printX() {
    console.log(MyClass.x);
  }
}
console.log(MyClass.x);
MyClass.printX();
  • public의 경우 외부에서 코드를 제어할 수 있습니다
  • protected외부에서 코드를 제어할 수 없고 extends했을 때는 해당 클래스 내부에서는 사용이 가능합니다
  • privateprotected랑 비슷하지만 하위 클래스에서도 멤버에 대한 엑세스 허용이 되지 않습니다
  • static의 경우는 클래스의 객체를 만들어서 쓰는게 아니라 클래스 자체를 수정할 수 있습니다


📝Abastract Class

class Derived extends Base {
  getName() {
    return "world";
  }
}
 
const d = new Derived();
d.printName();

class Derived extends Base {
//Non-abstract class 'Derived' does not implement inherited abstract member 'getName' from class 'Base'.
  // forgot to do anything
}

추상 클래스의 경우 상속받아서 사용하며 추상 메서드는 구현이 필요하다


📝Class Implements Interface

/** ---- class implements interface ---- **/
class BMW implements Car{

    color;
    wheels = 4;
    constructor(color: string) {
        this.color = color;
    }

    start(){
        console.log("go....");
    }
}

const bmw = new BMW('green');
bmw.start(); // go....
console.log(bmw); // BMW { wheels : 4, color : 'green' }

/** ---- class implements interface(2) ---- **/

interface A {
  x: number;
  y?: number;
}
class C implements A {
  x = 0;
}
const c = new C();
c.y = 10;
// Property 'y' does not exist on type 'C'.

인터페이스를 상속받을 때 Optional인 경우 해당 속성은 생성되지 않습니다


📝Type

/** ---- Type ---- **/
type Animal = {
  name: string;
}

/** ---- Type Extension ---- **/
type Bear = Animal & { 
  honey: boolean;
}

const bear = getBear();
bear.name;
bear.honey;


/** ---- Type vs Interface ---- **/
// interface 기능을 Type이 대부분 사용 가능하지만 Type은 재선언이 불가능
interface Window {
  title: string;
}

interface Window {
  ts: TypeScriptAPI;
}

type Window = {
  title: string;
}

type Window = {
  ts: TypeScriptAPI;
}

 // Error: Duplicate identifier 'Window'.


🔗 참고 및 출처

https://www.typescriptlang.org/docs/handbook/2/everyday-types.html

반응형